
There’s nothing worse than a slow website. You and your customers become frustrated and switch over to the competitor, even before anything has been added to the basket. Even Google “penalizes” slow websites with lower rankings in the search results. Fortunately, there’s a lot you can do to make a website run faster, thus providing users a better experience and a boost in search engines. In this article, we look at 6 different factors that can help make your site faster. It must be about:
- Choice of hosting and server
- CDN (Content Delivery Network)
- G-Zip compression
- Caching
- Image optimization
- Combination of CSS and JavaScript files.
But why is it really important that your website/shop runs fast? There are several reasons for this. The main one is that most people are impatient. Studies have been done that show that 53 percent of visitors from mobile phones leave a site if it takes more than 3 seconds for the site to load. As previously mentioned, there is also Google to take into account. Google sees a slow website as not being user-friendly. And Google has an interest in showing the most user-friendly websites at the top of the search results. Therefore, there is a risk that your site will be “pushed” to page 2 or 3 in Google’s search results if it does not run fast enough.
How fast is my site?
Before you start optimizing your site, you must of course know how fast / slow it is running and how you can improve it. There are various tools for this. The tools can also give you an idea of what makes the most sense to focus on.
Google PageSpeed Insights
PageSpeed Insights is Google’s own tool. Here you enter the address of your site, click “Analyze” and shortly afterwards you get a score and an overview of what you can do to optimize the speed.  PageSpeed Insights is Google’s own tool. Here you enter the address of your site, click “Analyze”, and shortly after you get a score and an overview of what you can do to optimize the speed. PageSpeed Insights generates two reports: one for mobile and one for desktop. Typically, the score for mobile is lower than for desktop. This is quite natural as mobile phones are typically not nearly as fast as desktop computers. If you scroll further down, you get an overview of what you can do to improve the speed. EDIT: Google PageSpeed Insights has the downsode that it’s only possible to test one page at a time. With this tool from Experte.com you can test multiple URLs on a site simultaneously.
Pingdom Website Speed Test
Pingdom Website Speed Test is another tool that also provides an insight into how the speed looks. Here, among other things, you have the option to choose from which location the tool should test the site. Pingdom has several servers around the world from which you can test the speed. If your site’s target group is within a smaller geographical area, it’s a good idea to choose the server closest to the target group. That way, you get the most accurate picture. If, on the other hand, your target group and users are spread over a larger geographical area, you should choose the server location that is closest to the majority of the target group. If you belong to this part, there is help to be had with a so-called CDN. We will return to that later. 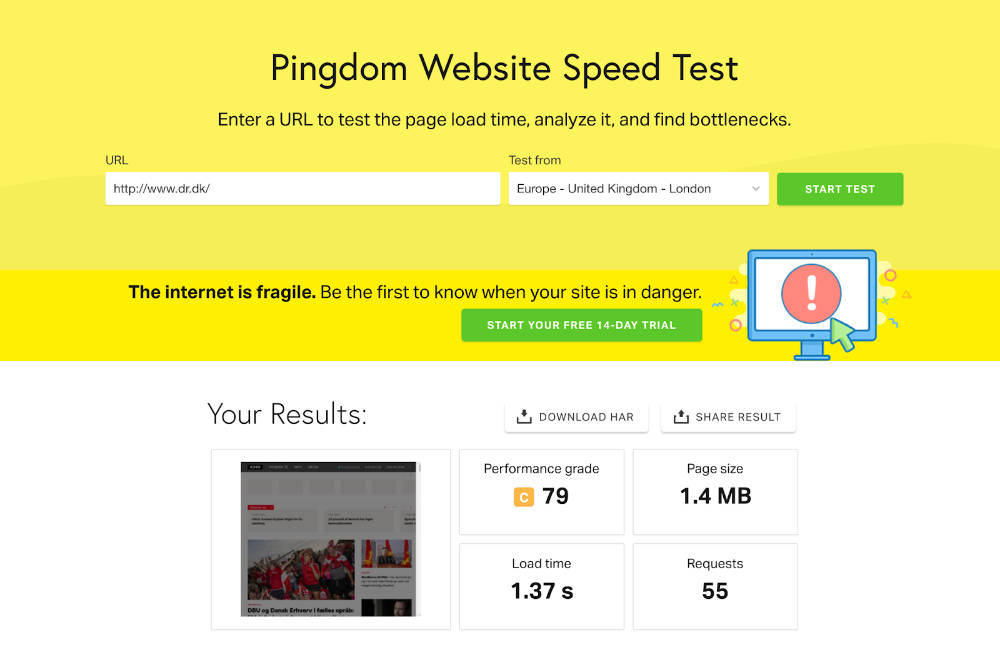 Pingdom Website Speed Test does not divide the result into mobile and desktop as Google does. Instead, you are informed of a “performance grade”, the size of the page, how long it took to retrieve the page and the number of requests. Performance grade is a score which is divided into A, B, C, D, E and F, and the closer you get to 100, the better performance grade you get. Requests is the number of server calls – i.e. the number of times the browser requests and retrieves something from the server (images, javascript files and css files). It goes without saying that many requests take longer to complete than fewer do. Like Google’s PageSpeed Insights, Pingdom Website Speed Test provides you with a thorough review of what can be done specifically to achieve a better performance grade. It’s fine to use both tools, but we recommend initially using the Pingdom Website Speed Test because it provides a simpler overview. Typically, you’ll get the information you need to start with: page size, load speed, and number of requests. But now to what it’s really about. How to make your site faster.
Choice of hosting and server
When you choose hosting and server (where your website lives) there are several things to take into account. It pays to spend some time finding out what type of hosting you need, where in the world the hosting server is located, and what hardware and technology are used in the servers.
Location
The closer the server is physically to the user, the faster the user will experience the site. Therefore, it is important to choose a host that has servers near your target group. If your target audience is spread over large parts of the world, then it is not so important where the server is located. But it will make the most sense if it is located close to the majority of people who use your site. Therefore – when choosing hosting, always make sure to choose a provider that has servers physically close to your target audience.
Server Type
It also pays to familiarize yourself with which type of server you need. Roughly speaking, servers can be divided into three categories:
- Shared hosting
- VPS hosting
- Dedicated hosting
Shared hosting is the most basic and cheapest solution. Popularly speaking, you “rent” space on a server, which you then share with others. This means that other websites are hosted on the same server where your site is located. If you have a smaller site or webshop, shared hosting can be an ok solution, but since you share a computer’s resources with others, speed problems can occasionally arise if there is extra pressure on the server in question. If you have a larger site with many visitors, it is well worth looking at a VPS solution. VPS hosting is a combination of shared hosting and dedicated hosting. VPS stands for Virtual Private Server and is a physical computer that runs several servers at once. A VPS server has a fixed portion of this computer’s resources allocated. This means that you do not share resources with others in the same way. A VPS server therefore runs independently of the other servers on the computer. Therefore, you have the opportunity to set up your server almost as you want. This type is typically faster, more secure than shared hosting, but the price is usually quite a bit higher as well. Dedicated hosting is a stand-alone computer that only runs one server – that is, you do not share hardware with others. With a dedicated server, you get full control over all settings. This type of server is a bit more expensive than the others, but in return offers the best performance and security.
Hardware
When you choose which server type you want, it is also possible with some hosts to choose which hardware you want in the server. Here, of course, it is best to choose a server with a fast processor, a good amount of RAM, fast SSD drive, etc. But again, it depends on what your site will be used for. If it’s a blog that only gets a few hundred hits a month, the hardware isn’t that important. If, on the other hand, it is a webshop with thousands of visitors per day, it pays to invest in hardware with better specifications.
CDN (Content Delivery Network)
If your server is located in, for example, Denmark, visitors from Denmark, the Nordic countries, and Europe will experience higher speeds than visitors from the USA, Asia, and Australia. It goes without saying that it takes longer to send information over long distances than short ones. If some of your visitors are geographically located far from the server, it might be a good idea to consider a CDN. CDN stands for Content Delivery Network. As the name suggests, it’s a network that delivers content to visitors. The network consists of servers around the world. Each of these servers is a “mirror” of the site located on your main server. In this way, visitors who are far from the main server can have content delivered from a server that is located closer to them. When a person accesses your site, the system will automatically find out where he/she is located and ensure that he/she receives content from the closest server.  In addition to users who are located far from the main server experiencing faster response times, it also provides better security as the content is spread over many servers. In addition, you will also experience better uptime. If your main server goes down, for example, there will still be a copy of the content on the various servers in the network, which will be shown to the visitor. Some of the most popular CDN services are Cloudflare, Sucuri, StackPath, and KeyCDN.
GZIP Compression
Just as you can make music files smaller by compressing them to another format – for example mp3 format – you can also make HTML, CSS and JavaScript files smaller by compressing them. These are the files that are sent to your computer from the server when you access a page on the Internet. This is where GZIP comes into play. GZIP is a data compression process that makes text files smaller in size. When you send a request to a web server to display a specific page, the process of compressing HTML, CSS and JavaScript files begins. Once that’s done, they’re sent to your computer, where your browser takes care of de-compressing the files (unpacking them) and displaying them. In this way, bandwidth is saved because the files take up less space than originally while being sent. The process of compressing and decompressing is much faster than if you send the files directly. It is possible to achieve a file size reduction of up to 70 percent with this technique. Therefore, it makes good sense to enable GZIP on your server. There are several ways to set up GZIP. Typically, you can activate it directly in the control panel of your hosting provider. If your site is hosted on an Apache server (WordPress etc.) you can also add a code snippet to the .htaccess file, which is located at the root of your website’s file system. Here you must either log in with FTP or through your control panel to access the file system where you can edit the .htaccess file. A third, and perhaps the easiest solution, is to install a plugin in your CMS. If you use WordPress, there are many different options. If you search for GZIP under plugins you will see quite a few different plugins. Make sure you choose a plugin that has good reviews and is updated regularly. If your site uses a CMS other than WordPress, there may not be a large number of plugins for the purpose. If so, use one of the first two options to enable GZIP. Read more about how to activate GZIP compression here.
Caching
In short, a cache is a catalog of files from pages that you (or others) have already visited that is displayed to the user temporarily. In this way, resources do not have to be used to send and retrieve the same data over and over again. There are two types of cache, which are good to know.
Client-side caching
When you visit a website, your browser will automatically save text, images and other content from the pages you visit. This copy of a website’s files is placed in your browser’s cache. When you access the same page at a later time, the browser will use the files in the cache that were saved the last time you visited it. In this way, the browser does not have to spend time downloading the same files again, as they are already located locally on your computer. Your browser’s cache is limited to the amount of space allocated to it. When space starts to run out, the oldest saved files are automatically deleted from the cache. But it can sometimes also be a good idea to clear the browser’s cache yourself. If you, for example, have made a small change on a page that doesn’t “break through”, it may be necessary to clear it before you can see the change. It is also possible through so-called headers, which are sent from the server, to tell the browser how and how long different files should be cached.
Server-side caching
In contrast to client side caching, server side caching takes place on the server where your site is hosted. Here, the server stores versions of pages that have previously been built and composed of files and data from the database, and sends directly to you. Time is therefore not spent looking up, for example, a database, which makes the whole thing faster. However, it has the same disadvantage that the cache must be cleared once in a while. The server itself takes care of that when something new is added. But here it is also possible to manage your cache yourself and clean it as needed.
Images
Images take up a lot of space. Quite a lot. Therefore, it is incredibly important that you only use the most absolutely necessary images. You must also ensure that your images are the right size and do not take up too much space.
Crop Your Images
Always make sure to crop your images to the size they should be. Firstly, it looks the best, and secondly, there is a lot to save on file size. Your images should only show what you want to show to your visitors. Furthermore, there is no need to use images in an excessively high resolution. For example, if there is only room on a page to display an image that is 800 pixels wide, then there is no reason to crop the image wider than 800 pixels. An exception is, of course, if the purpose of the image is that it must be downloadable and printable, you must be able to zoom in and see more details, etc. Then it is fine to put it on the website in a high resolution.
Use the new formats
For many years, .jpg, .png. and .gif were the only image formats that could be displayed in a browser. It has worked well, but there have been more and more that have gained traction in the various browsers. They have that because it has become possible to compress images even more, while maintaining or minimally reducing the quality of the image. Most newer browsers now support the formats WebP, JPEG 2000 and JPEG XR, which are the most widely used new formats. Therefore, when possible, save your images in one of these new formats. It is also possible to get various plugins for CMS systems which automatically convert your images. In other words, your site is scanned and the “old” images are automatically replaced everywhere on the site after they have been converted.
Lazy Load
The moment you access a page on your computer, the browser starts downloading all the images, files etc. which belongs to it. If, for example, if there are ten images on a page, all ten will be downloaded regardless of whether the user ever sees them. This causes a lot of file requests to the server, and time is spent retrieving files that may not be used. With lazy loading, images load individually, but only when it’s “their turn”. This means that the images that can be seen on your screen when the page loads will be displayed as always. But all the images placed below the visible part of the page will only load when the user approaches them – i.e., when the user scrolls down the page. In this way, only the images that the user needs are loaded. There are various plugins available for different CMSs that can help with this, but most newer browsers already support it. All you have to do is insert a loading attribute img-tags in your HTML.  WordPress recently ensured that all images are displayed as “lazy” by default.
Plugins
There are many different plugins that can help optimize your images. If your shop runs on WordPress, we recommend either Imagify or Smush. They both optimize your image files, compress them and ensure that they are “lazy loaded” in the best way. You can also manually compress your images here.
File Combination
A website is made up of various text files. A lot of them are CSS files and JavaScript files. CSS files tell the browser how a page’s layout, colors, etc. should be and JavaScript files add extra features and interactivity. When loading a page, all these files must be fetched from the server (unless they have been cached). This results in one server call per file, which we know takes time. It can quickly result in many server calls if your site is large and has many extensions in the form of plugins and themes. Therefore, it can be beneficial to combine all CSS and JavaScript files into larger composite files. This way, the files become larger, but the advantage is that they only need to be retrieved from the server once.  There may of course be exceptions, where you only use a special script on a certain page, where it does not make sense to combine it with other files. There is no need to load a script on a page where it is not used. If you have many files of this kind, they should of course not be combined with the general files. The easiest way to combine files is by getting a plugin or extension for your CMS that does it all automatically.
Plugins and extensions (WordPress)
There are a plethora of different plugins and extensions that can assist with various possibilities.
WP Rocket
One of the best for WordPress is WP Rocket. WP Rocket is a “package solution” that can optimize your site in many areas. It has built-in cache settings, it works well with most CDNs, it integrates easily with Imagify (it’s the same developers who made it) and you can combine CSS and JavaScript files crosswise. Furthermore, WP Rocket offers their own CDN network. WP Rocket currently costs 49 USD per year, which includes a year’s updates and support.
WP Fastest Cache
WP Fastest Cache is another option, and does pretty much the same thing as WP Rocket. However, there is the difference that WP Fastest Cache is available in a free version and a paid version. The paid version WP Fastests Premium is very close to WP Rocket in terms of functionality, but lags a little behind in terms of user-friendliness compared to WP Rocket. One of the advantages, however, is that you do not pay for the plugin on an annual basis. WP Fastests Premium is a one-time purchase, which means, among other things, that there are no restrictions on updates.
Conclusion
It is important to have a fast site. It’s delicious for your users and good for your rankings in Google search results. Therefore, we would like to encourage you to start optimizing your shop immediately. The easiest solution is to use an extension/plugin that handles most of it for you. You can also tackle one small thing at a time. For instance, you can start by getting your site on a CDN and then ensure that all your image files are reviewed, optimized, and replaced where necessary, etc. The most important thing is that you get started and ensure moving forward that your site is in top shape and operates optimally. We hope you found inspiration with this post.


